The purpose of the Pattern Uploader is to provide you with a means of uploading your existing patterns so you
can share them with others in our Free Pattern Sharing area, or into an area where you can offer them for sale.
Please note that the Pattern Uploader is for uploading patterns, not images,
drawings, or photos from which to make a pattern. What you upload here would either be the finished output of the
PatternWizard, another pattern making program, or your own drawn and detailed pattern.
Before going through the upload process, let's go through some basic concepts.
You'll be telling our system the following information:
• Whether you want to offer the pattern as a freebie, or for sale.
• The pattern file name to upload
• A thumbnail image to upload
• One or more stitching categories for the pattern
• Stitch type (i.e. Beading Loom stitch, Crochet Tunisian stitch, etc.)
• What you want to use as a name for the pattern
• A description of the pattern
• Key Words that will help people find your pattern
• And some optional information such as number of colors, stitches, and rows
We accept a variety of pattern file formats, including .jpg, .gif, .png, .wbmp (not to be confused with .bmp),
.pdf, .doc, .rtf, and other Microsoft Word formats. More upload formats will be coming, but we need to catch
up with some other basic program enhancements first.
Armed with this information, let's go through the upload process.
As you enter the Uploader page, you'll find 9 steps, clearly laid out.

Step 1 - Free or For Sale?
Here's where you tell us whether we should offer your pattern in our Free Download area, or whether you want
to sell it in our Patterns For Sale area. Simply check the desired box. More details about the free and
for sale areas will be give a bit later.
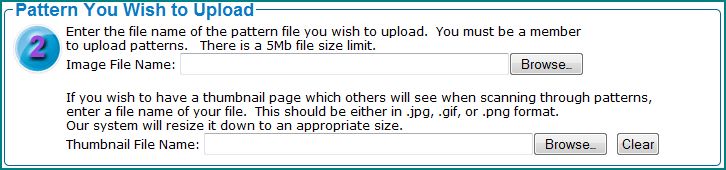
Step 2 - Pattern You Wish to Upload
First, you'll normally be uploading both a pattern, and a thumbnail picture of the pattern, finished work,
or whatever you want. This is what someone will see when searching or scanning through patterns.
When uploading a pattern and thumbnail, the two files can actually be different formats. For example,
you could upload a .pdf pattern and a .jpg thumbnail. In theory, you could also upload the same file for
both the pattern and thumbnail, but this would normally be in the case of a single page pattern.
If you elect to upload a .pdf document as a thumbnail, you'll enter the file name in the "Thumbnail File Name"
box. The system will immediately determine that it's a .pdf file, and ask you for a page number to use as
the thumbnail.
So, let's go through an example. Let's say you have a 10-page .pdf pattern. The last page shows an
image (for instance, a photo) of the finished item. So you would enter the .pdf file name into the
first ("Pattern File" box). Since you probably want to use page 10 of this .pdf document as your pattern's
thumbnail, you would enter the same file name in the "Thumbnail File Name" box. As soon as you enter the file
name into the thumbnail box, a new box pops up asking you for the page number to use for the thumbnail.
It comes up filled in with "1". In this example, you would change this to "10", since we've said
your page you want to use as a thumbnail is page 10.
Also note that the page number you enter is not related to a page number printed in the document. Your
document might, for example, have a cover sheet, and then its page numbers begin with page "1" after the cover
sheet (kind of like books don't start with page "1" as the very first page). So the page number you enter
in the Uploader is the physical page number in the .pdf document, beginning with page 1 as the first physical
page. Don't worry too much about this. Just begin counting pages from the first page.
(Makes sense).
If you enter a file name in either the "Pattern File Name" or "Thumbnail File Name" box and want to change it,
simply click the Browse button for that file name and re-choose your desired name. If you enter a thumbnail
file name and then decide you don't want to upload a thumbnail file, click on the "Clear" button and
the "Thumbnail File Name" box will be emptied.

Step 3 - Stitching Category
Select one or more stitch categories that your pattern applies to. For example, if a crochet pattern
includes details for knitting, you could check the Crochet and Knitting boxes. The boxes you check will
be part of the search information to help people find your pattern.
As you make selections in this area, you will see options pop up in area 4 (stitch types).

Step 4 - Select Your Stitch Type(s)
Assuming you've selected at least one stitch category in step 3, there will be stitch types listed in this
area. Simply check the desired boxes. Again, this information relates to helping people find your
pattern.

Step 5 - Pattern Name
Enter the name you call your pattern. This is different than your file name entered in step 2.
It's what you want others to see when they look at your pattern.

Step 6 - Pattern Description
This is a description of your pattern so others can read more details about it.

Step 7 - Key Words
Enter key words here, which will allow people to find your pattern. For example, for a cross stitch
pattern of a bunny, you could enter:
Cross stitch, bunny, rabbit, ears, cute
Then if someone should search for "cute", your pattern would be one of the results.

Step 8 - Optional Information
Currently there are four pieces of optional information that can be entered:
Number of Colors: As it implies, enter the number of colors used in your pattern
Number of Stitches: Enter the number of stitches
Number of Rows: Enter the number of rows
Yarn/Floss Brand: Enter the yarn or floss brand used with the pattern
Again, these four items are optional and will show when someone looks at your pattern preview.

Step 9 - Send It!
When you're ready, click on the "Submit My Pattern" button. Depending on the size of your uploads,
there will be a processing time of anywhere from 2 to 20 seconds, during which time you'll see a little spinning
icon next to the button on which you just clicked.

When it's done, you should see a "Thank You" message,
and a message stating that your pattern has been submitted for approval. We will attempt to look at and
approve it in less than a day. Sometimes this is done within minutes. But keep in mind that it's
a manual process.
If when you submit your pattern, you receive an error instead of the "Thanks" message, simply correct the item
referred to in the error message, and click on the "Submit My Pattern" button again.
Free Area
As an educational stitching community, we welcome patterns which are submitted for free sharing with others.
Please be sure your pattern meets our terms.
You can now go to the Pattern Menu Page or, if you're ready to try your hands at
creating your own pattern, you can go right to the Pattern Uploader.