Note: 3-15-14 - This help page is starting to become a bit outdated but everything explained here still applies. I
have been adding new features that are not listed here. Most new features are explained in the
Community freePatternWizard
area. Sometime in the next month or so I'll be adding better usage assistance.
Generating a Pattern
Basically this is done in 9 steps.

Step 1 - Image to Convert Into a Pattern
First, you'll need to tell the system the file name you wish to upload. Stitchboard members can upload
a variety of format files (as can non-members, although non-members are more limited), including .gif, .jpg,
.jpeg, .png, and .wbmp. The latter is not to be confused with .bmp. The .wbmp is a special portable
image type. More image formats will be coming.
To enter a file depends on your particular browser. Some browsers will let you click in the file box
and type in a name. In these browsers, you can also click on the Browse button and locate the file on
your drive. Other browsers will always open a disk browser window, where you will locate your desired file
and click Open.

Step 2 - Stitching Category
In this area, you will select the stitching category in which you wish to create a pattern. Currently
your options are Beading, Crochet, Cross Stitch, and Knitting. (Please note that when it comes to the
finished pattern, should you decide to list it for free download or for sale, in many cases, selecting Crochet
will create a pattern that will be listed under Crochet and Knitting in searches. A pattern created in
Crochet Filet stitch will only be listed under Crochet. And vice-versa; creating a knitting pattern will
also create a pattern that will be searchable under knitting and crochet. ) Don't panic if, as you make
selections on the screen, you see other options change. This is normal, in an attempt to be sure all
options for a particular stitch category and type are compatible.
For example, when Beading is selected, area 3 (Select Your Stitch Type) only shows beading stitches. If
you click on the Crochet category, area 3 will change to only crochet stitch types.

Step 3 - Select Your Stitch Type
In this area, you will select the type of stitch desired. For example, if you have selected the
Beading category, you will be able to select Loom, Square, Brick, and Peyote stitches. Stitchboard members
will also be able to select Right-Angle-Weave (RAW), and Herringbone.
Again, as you make a selection, you may see other options change.

Step 4 - Select Your Desired Stitch Shape
Speaking of the devil, in the case of Beading, here's where you'll select the type of bead, and thus the
stitch shape. RAW and Herringbone stitches will only allow oval (seed beads), while the other beading
stitch types will allow both oval and rectangle. For Crochet, Cross Stitch, and Knitting, there is
currently only a standard stitch shape (rectangular or square).
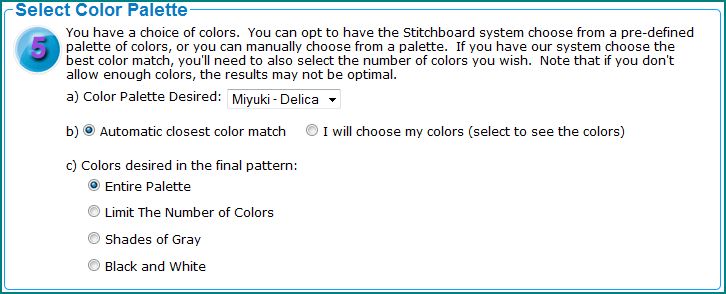
Step 5 - Select Color Palette
Now is when the fun starts. This section allows you to specify all sorts of things about the colors you
want.
Section "a" allows you to select the manufacturer's palette you want. The palettes vary depending
on the stitch category. For Beading, you can select Miyuki Delica, Miyuki Seed, and Our Palette
(which is actually a modified version of DMC colors). For Crochet and Knitting, your options are DMC,
Anchor, and Our Palette. For Cross Stitch, the palettes available are DMC, Anchor, and Madeira. More
palettes will be coming in the future.
Section "b" allows you to choose either an automatic color selection mode, or whether you want to manually
select your desired colors from the given color palette in section "a". The default is to have the system
attempt to locate the closest colors to what's in the image or drawing that you upload.
If you click on the "I will choose my colors" option, you will see the entire palette that you selected in
section "a". Generally, these are sorted by the manufacturer's color number. If you point to
a particular colored box, the manufacturer's color name will pop up. This way you can be doubly sure that
the color number and name match what you want. To select a particular color, simply click in the small
checkbox and a small check mark will appear in the box. There is also a color count at the top and bottom
of the color display, which will let you know how many colors you currently have selected. Currently
we have set the maximum number of manually selected colors at 30. If you try to select a 31st color,
the system will complain and remove the check mark. You should select at least 2 colors and no more than
30. If you have opened the manual color palette and wish to close it and go back to automatic, simply click
back on the "Automatic closest color match" button and the palette will close. Also, if you have an open color
palette and wish to select a different one, simply go back to the pull-down menu box and choose a different palette
name. The new open color palette will change to the new one. For example, if you select DMC and manual
color selection, you will see the DMC palette of colors. Now if you go back and drop down the menu and change
the palette to Anchor, the DMC palette on the screen will change to Anchor. Neat, huh?
One note about the colors on the screen: The colors on the screen are as close to manufacturer's actual color
that we could create, but there's no guarantee that they're exact. For your protection and ours, "The
colors on the screen are for reference only and to be absolutely certain, you're best either doing your final
match at a store, or by obtaining an actual color sampler. "
Section "c" (Colors desired in the final pattern) allows you to customize the way the computer selects
the colors. (See more color selection options later in section 8). Your options are:
Entire Palette: The computer will match colors using the entire palette of colors. Keep in mind
that by using this option, you may be matching between 800 or 900 colors so you may get a lot of colors in your
final pattern, and many may look similar.
Limit The Number of Colors: You can limit the number of colors the computer selects from the given
palette. When you select this option, another box opens that lets you specify the number of allowed colors.
So if you entered 10 colors, your final pattern will have 10 colors. Again, the computer will do
its best to select the 10 closest matches. If you select too few colors, the colors it selects may not
be great. Too many colors may give you a confusing pattern.
Shades of Gray: Select this if you want your pattern to be made up of only shades of gray, including
black and white. Again, when you select this option, another box will open and allow you to enter the number
of shades desired. There are a limited number of shades of gray (this is defined by manufacturer, not by
Stitchboard!), so too large a number will not get you more colors.
Black and White: This will give you a black and white pattern. Don't panic if you don't like
everything the way it draws it out. There are other options in section 8 that can make things better.

Step 6 - Enter the Desired Number of Stitches Across
This is where you enter the number of stitches across that you want your pattern to be. Stitchboard
members can create a pattern up to 150 stitches across. Non-members are limited to 100 stitches.
The number of rows will be automatically calculated to keep your image proportional. So if your
original image is 400x600 pixels and you enter 100 stitches, your final pattern would come up with 150 rows.
There is a limit to the number of rows, but this is decided depending on the number of colors, stitch,
stitch type and some other factors. The system will tell you if you go over the limit.
HINT -- If the number of stitches across is not the same as the number of the original pixels across,
there will be some dropping or adding of additional stitches in your final pattern. So for smaller images
(150 pixels across or less), the optimal setting is the same number of stitches across. For example, if
my original drawing is 100x120 pixels, the absolute best setting would be 100 stitches across. The
resulting pattern would then come out 100 stitches, by 120 rows. For larger original images, it's
often best to try various stitch counts to find a setting with minimal changes to the picture.
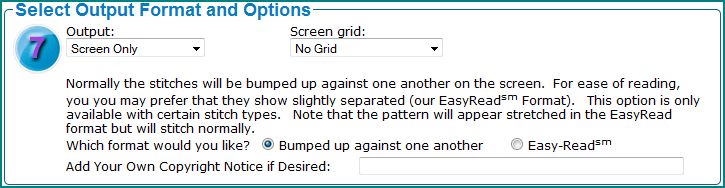
Step 7 - Select Output Format and Options
Output: This option allows you to select either screen or .pdf output. The screen-generated
pattern can also be printed and/or saved to disk. When selecting a .pdf output, you will also have additional
options. First, you can select to get a .pdf with colors only. Or you can select symbols only. Or,
you may want both colors and symbols. The other options you'll have are to add additional custom information
on the cover sheet of your .pdf pattern. You can enter your pattern name, your company name, an optional email
address, your web site url, suggested fabric, other notes, and an optional copyright notice. All of these items
will print on your pattern's cover sheet. If you leave any of these items blank, the line will not show up
on the cover sheet.
Speaking of cover sheet, this page will be the first one shown in your .pdf file. At the top will be your
pattern name. Then in a section below that will be your optional items we've just talked about. In the
case of cross stitch, you'll also see the stitch counts, color count, and various sizes, depending on the fabric
count. Below this information will be a small preview of your pattern. And below the preview will be
a key of the symbols, sample swatches, the manufacturer color numbers, and descriptions. If there are more
lines to the key than will fit on the cover sheet, the system may move the key onto a second page. If the
key fits on the cover sheet and a second page, it will begin on the cover sheet and continue onto a second page.
Speaking of cross stitch, on the .pdf output, the center marks will show as small triangles at the top
and left of the center page.
Grid: This is a nice feature that allows you to see your pattern on a grid, for easier counting and
stitching. You options are:
No Grid: Just like it sounds, there will be no grid
Every 5 Stitches: Places a grid line every 5 stitches
Every 10 Stitches: Places a grid line every 10 stitches
Every 5 and 10 Stitches: Places a darker grid line every 10 stitches, and a lighter grid line every
5 stitches.
Also, please note that, depending on your stitch type, there may only be a grid going across
or down the pattern. For example, in the Beading brick stitch patterns, grid lines will only go across,
not down. And similarly, with peyote stitch, grid lines will go up and down, not across. And grid
lines are not an option with RAW at the present time. The next option is not always present. It
depends on your stitch category and/or type. Remember, everything is interactive, so as you make
selections, other options come and go. When present, this option allows you to create a pattern
with the stitches bumped up against one another. Or you can opt to have a space between them all, to make
things easier to read (ergo the name Easy-Read). This option is currently available for:
Beading - Loom, Square
Crochet - Standard and Tunisian
Cross Stitch - Standard
Knitting - Standard
The Easy-Read option will be available for other stitches in the future. There is one other
option in this section.
You can enter a copyright notice if you would like ownership information printed
right in to your pattern. It will appear near the bottom, between the pattern and the color swatches.
We'll discuss the final output a bit later.
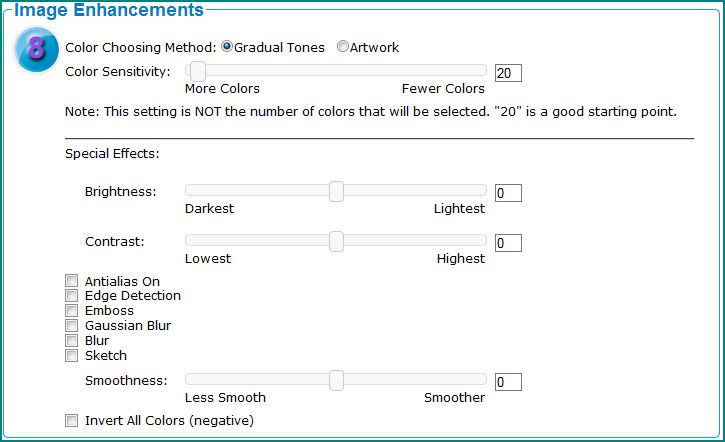
Step 8 - Image Enhancements
Whew. Where do we begin? This option gives you abilities not available anywhere else!
We'll go through the ones available right now. (More coming in the future). The first two options
are available to everyone - Stitchboard members and not.
Color Choosing Method: There are currently two options, Gradual Tones and Artwork.
"Gradual tones" is a good option for photographs that often have smooth transitions between colors.
The "Artwork" option is good for originals that have a more defined transition between colors, like line
drawings, cartoons, and other hand-drawn art. But, this is not cast in stone, so experiment! Some photos
may look better with the Artwork setting. And some artwork may look better in the Gradual Tones setting.
Go figure... You'll find that you can generate a pattern one way, click on an Edit button, make one or
two setting changes and re-submit it to see if it comes out better or worse. As you spend time with it,
you'll find settings that you like for certain types of images. This is part of the fun of our Pattern
Wizard!
Color Sensitivity: This is probably my favorite option of them all. Here you can set it
so the system chooses more colors or less. The default is a value of 20. I find that if
I'm getting 30 or 40 colors in the final pattern and want to cut the number down, sliding the button a little to the
right may cut the number down to around 12-15 colors. I often find that the colors
chosen in the final palette when changing this option slightly to the "fewer colors" side are often more accurate
to the original. You can actually try different settings, cutting down the number of colors a little at
a time, until the colors in the pattern look bad, then reverting back just a bit. I have taken an original
image that was creating a pattern with 93 colors, and by adjusting this option up a little, got it down to
10 colors with no noticeable color mismatches. So do experiment with this option!
The rest of the Image Enhancement features are only available to Stitchboard members. And remember that
membership is free!
Change Brightness: You can change the image brightness if desired. Your original image quality
will determine whether this function needs to be changed. Simply slide the control to the right or left to make
changes.
Change Contrast: Allows you to adjust the image contrast. Again, your original image quality
will determine whether this function needs to be changed.
Antialias On: Check this box to enable antialiasing, which smooths edge transitions. If
your original image has jagged lines, turning this on can smooth them out.
Edge Detection: A function that attempts to detect lines within your image. Depending on your
original image, this function can sometimes create an almost line-drawing look to your image. Many times,
turning this option on will only give you a gray image with some lines in it. Again, feel free to
experiment.
Emboss: The emboss function attempts to create an "embossed" or "3-D" look to the image. As
with the Edge Detection option, the results vary greatly, depending on your original image. Experiment!
Gaussian Blur (also known as Gaussian smoothing): This function is often in photo software to reduce
noise in an image. It is also used to slightly blur an image that's a half-tone (or made up of dots, like a
newspaper photo). You may or may not notice any change when using this option. It depends on the
original image and how you have some of the other enhancement features set.
Blur: This option does a generic blurring of the image. It's relatively straightforward and
the results will vary, depending on the original image.
Sketch: Turning this option on has varying effects on your image. It seems to try to pull
lines out of darker areas and make an image a bit more like it was hand-painted. Depending on your original,
the resulting pattern may be interesting, or a bunch of strange starry things going on. Experiment with this
in combination with other effects.
Smooth: As the name implies, it smooths your original. Not! But it does do some
interesting things to your image when you set it down near the lower settings. I think the higher settings
do a bit of smoothing of lines. All in all, just an interesting option.
Invert All Colors: Here's an easy one to describe. It simply makes a negative out of your
image. Black turns white. White turns black. Blue turns yellow. Etc. I found that
using this in combination with a few of the other effects makes for some really interesting results.
And for fun, there are more special effects coming.

Step 9: Let's See It! Finally, click on this button to submit your settings and generate
your pattern. Depending on the size of your original image, in a few seconds, you should get a pattern
meeting your specifications.
This is a starting point. Let's briefly discuss the results.
If your pattern is small enough to print onto a single sheet of paper, you'll see the following buttons:

If your pattern is too large to print onto a single sheet of paper, you'll see the following buttons:

Above the pattern are some buttons.
Download Pattern: Clicking on this button will open up a window that will allow you to save the
pattern just generated onto your disk drive. You can name it anything you want and place it anywhere on
your drive that you desire. When done, the window will close.
Change Setting: This button will begin the process all over. BUT, it will remember your previous
settings so if you want to make any changes, you need only change those settings that you want. The rest
will remain the same. We'll discuss this option in more detail shortly.
Erase and Start Over: Click on this button to forget everything about your previous image, pattern,
and settings and start over as if you just ran the program for the first time.
Share This Pattern: This will be discussed later, but basically it allows you to upload the pattern
you just created and allow others to see it and download it. When you click on this option, a window opens
and you will enter a name, description and searching key words so others can find your pattern. Again,
more about this later.
Print Pattern: This button will show if your pattern is small enough to print onto a single page of
paper. If not, the Print Pattern button will not show and we suggest creating a .pdf pattern and printing
that. When the Print Pattern button does show, clicking on it allows you to print the pattern you just created.
When clicking on this button, a new window will open, as well as a print window. Assuming you've printed
before with your computer, the operation is the same. After you press the "Ok" or "Print" button in your print
window, your computer will print the pattern. You may need to change your print settings to either adjust
the size or split it into multiple pages. After printing, the print and smaller pattern windows will
automatically close and you'll be left once again at your pattern page. Note that this is not a screen print,
but actually only prints the pattern, from just below the buttons to the number of colors and stitch count.
So we've discussed the buttons above your new pattern.
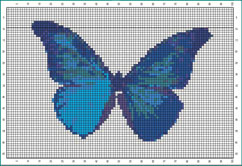
Just below the buttons will be the pattern. You'll notice several things about the pattern.
There are stitch and row counts along the top, bottom, and sides. If you have selected a grid,
you'll also see that. The pattern itself is pretty self-explanatory. If you've selected the Beading
category, it'll show your pattern using ovals or rectangles, as you specified. Other stitch categories will
create similar patterns, but use rectangles or squares. In the case of an Easy-Read pattern, the stitches
will be separated by spaces.

Below the image portion of the pattern are swatches of the colors used within the pattern.
You see both the colors and the manufacturer's color numbers. You also see the number of stitches that use
this color.
Below the color swatches and counts is your copyright notice, if you entered one. Three other pieces of
information are below the color swatches. First is a shameless mention that our software generated this
free pattern. Below that, are the total number of colors used, and total number of stitches in the pattern.
Ok, so you've just created your pattern but want to see how it would look with slightly fewer colors.
Simple. Click on the Change Setting button (which should be Change Setting(s) since you can make as
many changes as you want on the next screen).
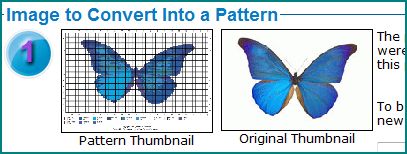
After clicking on this button, you'll magically return to the
original Pattern Wizard page; however, now you'll also see two thumbnail images of what you're working on.
One thumbnail will be of the final pattern just generated. This is only a rough summary of the pattern
you just created. There may be strange patterns showing up in the grid. Ignore this. It's
caused by reducing a "lined" image, or image containing lines. If you've ever heard the term "moiré
pattern", this is what causes the pattern thumbnail to often look different. And also, in fitting it to the
little thumbnail window, the proportion may also be off. Again, don't worry about this either. This
is only to give you an idea of what you're working on. To the right of the pattern thumbnail is a thumbnail
of your original image. Assuming you don't want to change the original image file name and upload a new
image, simply continue to steps 2-9, depending on what change(s) you want to make. If you DO want to change
images, then enter the new file name in the box next to the two thumbnail images.
Feel free to generate patterns for multiple stitch categories, too. So, for example, if you just created
a pattern for beading and selected to share it with others in our free area (thank you very much!), you can click
on the "Change Setting" button, go to step 2 and click on Cross Stitch, go to the bottom and click on the "Let's
See My Pattern" button, and, voila, now you have the same image in a cross stitch pattern. Go ahead and share
that, too, if you'd like.
You can now go to the Pattern Menu Page or, if you're ready to try your hands at
creating your own pattern, you can go right to the Pattern Wizard.